0. Installation
Download and extract the zip-file from here.
Copy the folder "antonisschley" and paste it into the content-folder of your UE4-project.
You should now have the tool in your content library in the UE4-editor.
1. Workflow
PLEASE NOTE: THIS IS AN EXPERIMENTAL TOOL. YOU SHOULD NOT USE IT ON SENSITIVE/VALUABLE DATA. IF YOU DO SO, IT IS AT YOUR OWN RISK.
Click the right mouse button on the Editor Utility Widget "Orbit_Cam_[version]" and select the top option Run Editor Utility Widget.
This will open up the interface and switches your standard editor viewport camera to a temporary camera for the session.
This camera is meant for viewpoint setup and is not providing the full Orbit Cam functionality you get during gameplay.
Fly to your desired perspective and setup the camera settings for your viewpoint. Hit "Make Viewpoint". By that, a Pwn_OrbitCam actor will spawn and the viewpoint will be added to your collection in the interface.
When finished setting up your viewpoints, you can make some general settings for Gameplay:
Should the OrbitCam system be activated for Gameplay, Input-Devices and the motionspeed. By default, The OrbitCam and both input-methods are activated.
You don't need to make any settings to your project or level in order to get OrbitCam running and receiving inputs during Gameplay. Its all being done for you.
If there is already a player start and some gameplay settings in your level i would suggest you to deactivate or delete them, as they might interfere.
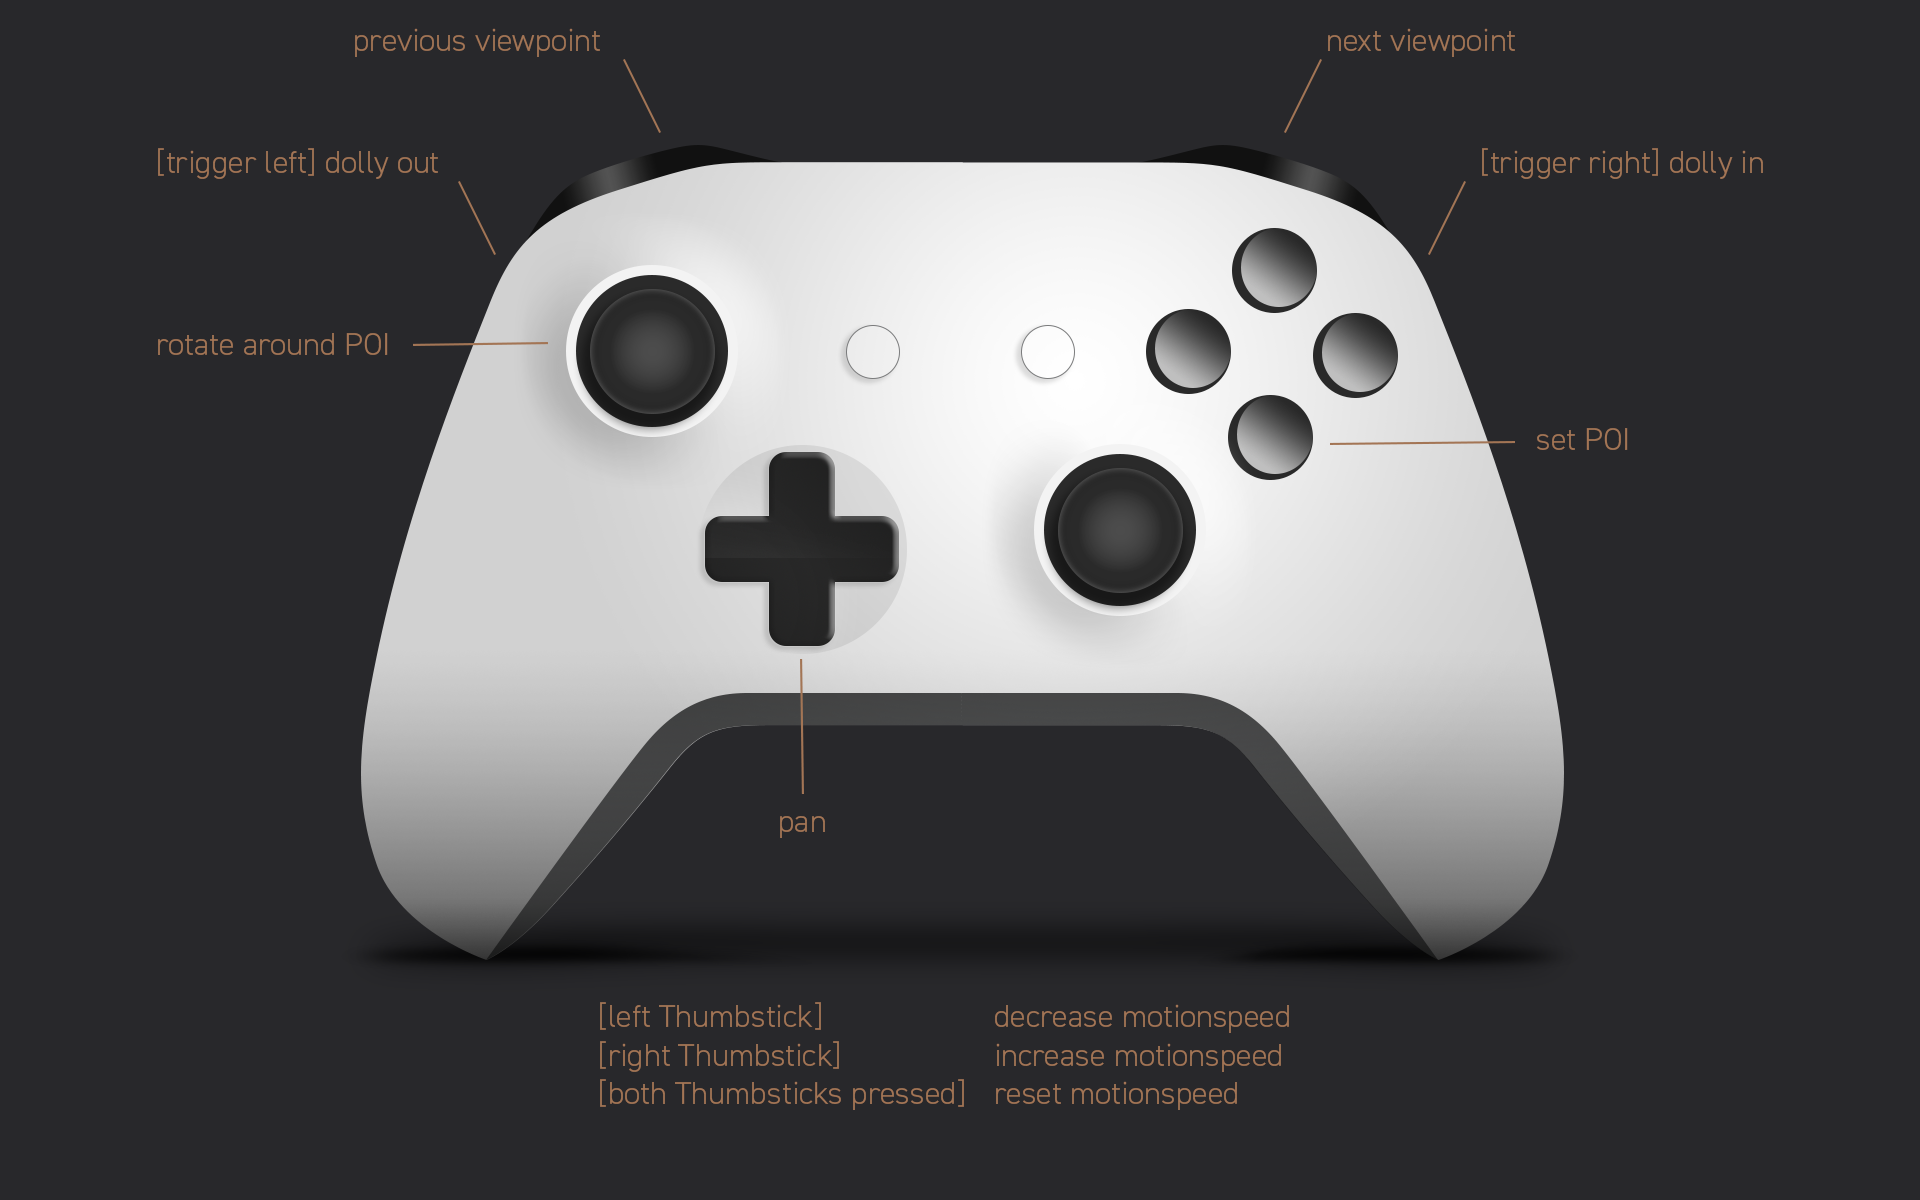
During gameplay you can freely navigate through your level and fly to your viewpoints. Therefore you can either use the hotkeys you defined before or use the shoulder buttons on your gamepad. Using the shoulder buttons will go through your viewpoint according to the order of your collection.
That's it!
2. Interface

2.1 Viewpoint functions:
These functions already have effect in the editor before Begin Play. They mainly control the temporary work camera during the usage of Orbit Cam Widget. No permanent camera in your level will be changed.
Make Viewpoint
spawns an Orbit Cam pawn in your level with the camera set up according to your choices. Per default the point of interest will always be on the geometry in the center of your viewport. It also adds a viewpoint to your viewpoint collection in the Orbit Cam Widget. After the first Viewpoint is created, gameplay only functions will be activated. Using the orbit navigation of the pawn is only possible during Gameplay.
Set focus
will focus on the center of your viewpoint. Focus distance can still be manually corrected afterwards.
Autofocus
affects the work camera in the editor as well as the camera pawn later during gameplay. Autofocus is a general setting and will deactivate any custom viewpoint focus distance while active itself. Focuspoint is always the center of your viewpoint.
Set point of interest
will place a marker on the geometry in the center of your viewpoint. Nothing further happens until you make a new viewpoint. Doing so will make the marker the point of interest of the freshly made viewpoint no matter of the relation to the camera.
If you click again while the button is active, the marker will be removed.
Focal Length
in mm.
Aperture
in F-Stops. Minimum is 0,1. Maximum is 22. When Auto exposure is turned off, this will have an effect on the brightness of your scene.
Focus Distance
in mm. Will update permanently when Autofocus is active.
Roll
in Degree. This will rotate the camera around its viewing axis.
Auto Exposure
is only available for changes when a post process volume is present in the level. You can choose between the default two automatic methods of auto exposure and manual exposure. This setting will stay with your post process volume, which means, that your scene will probably look totally different with the editors default camera.
Exposure Compensation
is only available for changes when a post process volume is present in the level. You can finetune the brightness of your scene. This setting will stay with your post process volume, which means, that your scene will probably look totally different with the editors default camera.
These functions have no effect in the editor, but only during Gameplay. Therefore, these functions are turned off as long as there is no viewpoint available.
Orbit Cam is on!/Orbit Cam is off!
When turned on,
Orbit Cam will automatically assign an Orbit Camera pawn to the player at Begin Play. No Player start or any other setting is needed. It may lead to unforseen effects with custom player/pawn settings made to the level.
When turned off,
no Orbit Cam related actor will spawn to the game.
Mouse only/Gamepad only
I prefer gamepad input for rotational cameras much more than mouse.
Movement is much smoother and consistent. Both input methods are supported though.
For error minimization during presentation you can limit input to only one device.
Motion speed
determines the default general speed of all camera movements. It is a value without unit. You can still change it during gameplay (non-permanent).
2.3 Viewpoint collection:
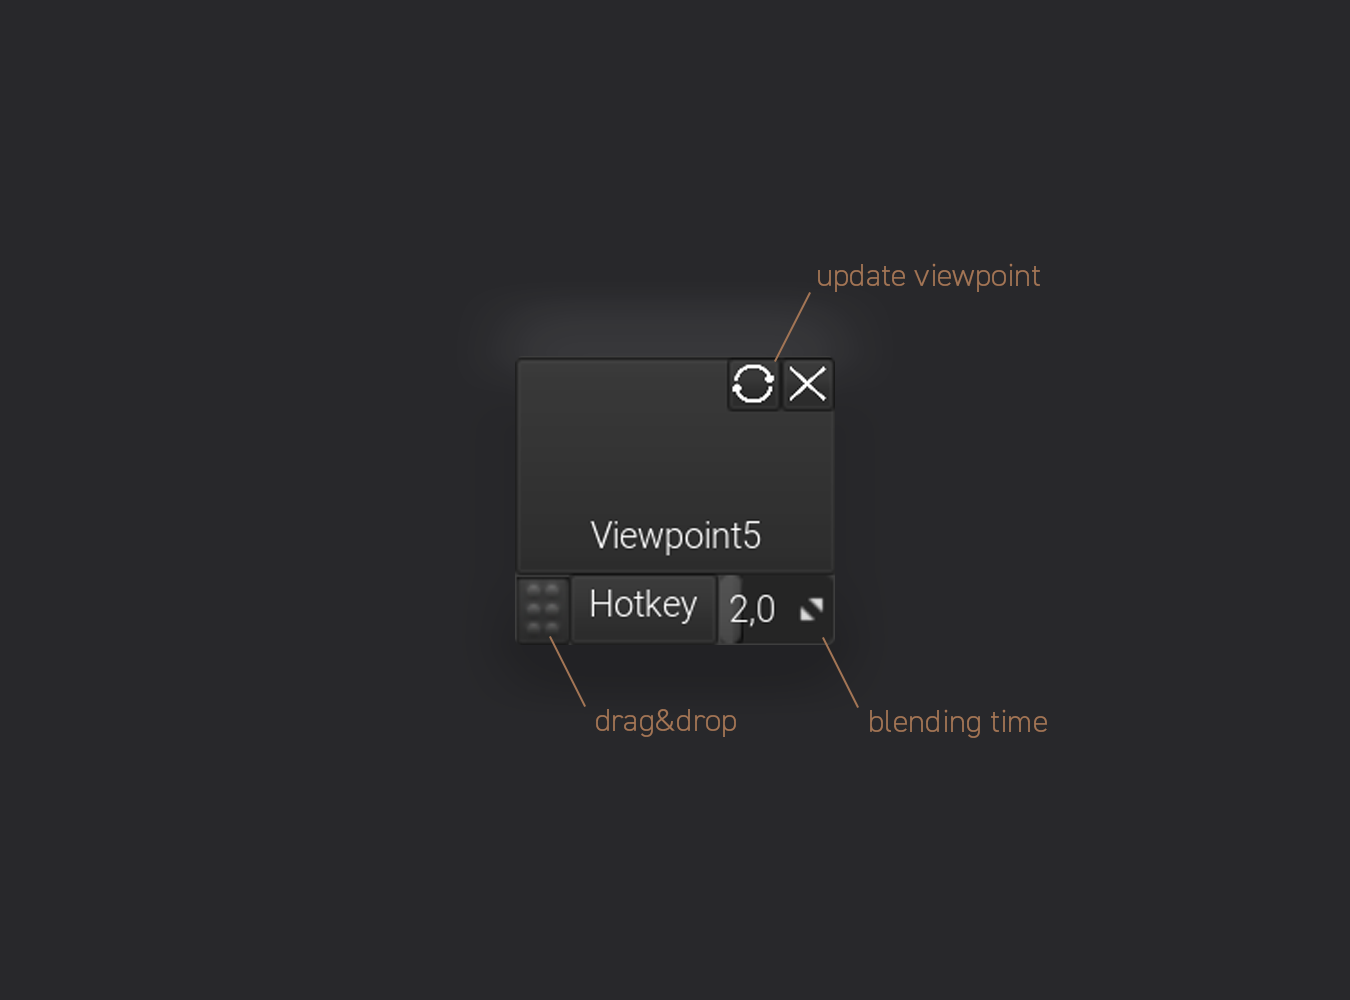
Your viewpoints will be listed in a tile view collection on the right side. Every viewpoint comes with the following functions:
Go to
When clicking on the big center button, the workcamera will go to the according viewpoint and applies the same settings. It will either fly to your viewpoint or jump to it according to your setting in "blending time". In the lower area of the button you can rename your viewpoint, this will also change the name of the camera in your level.Update
will transfer all attributes of the workcamera to the according viewpoint.Drag & Drop
Clicking and holding a viewpoint by the grip-area lets you rearange your viewpoints. This is especially important for gamepad navigation, because the order of your viewpoints in your collection will be the order to go through with the shoulder buttons on your gamepad.Hotkey
lets you define a keyboard key to initiate the switch to the according viewpoint. At the moment only single-key hotkeys are possible. In order to set a hotkey you click on the button. The interface will then wait for your keyboard input and use this as hotkey.Blending time
sets the duration of the animation to the according viewpoint. Setting this value below 0,1 will lead to an instant camera switch.3. Input
3.1 Mouse control:
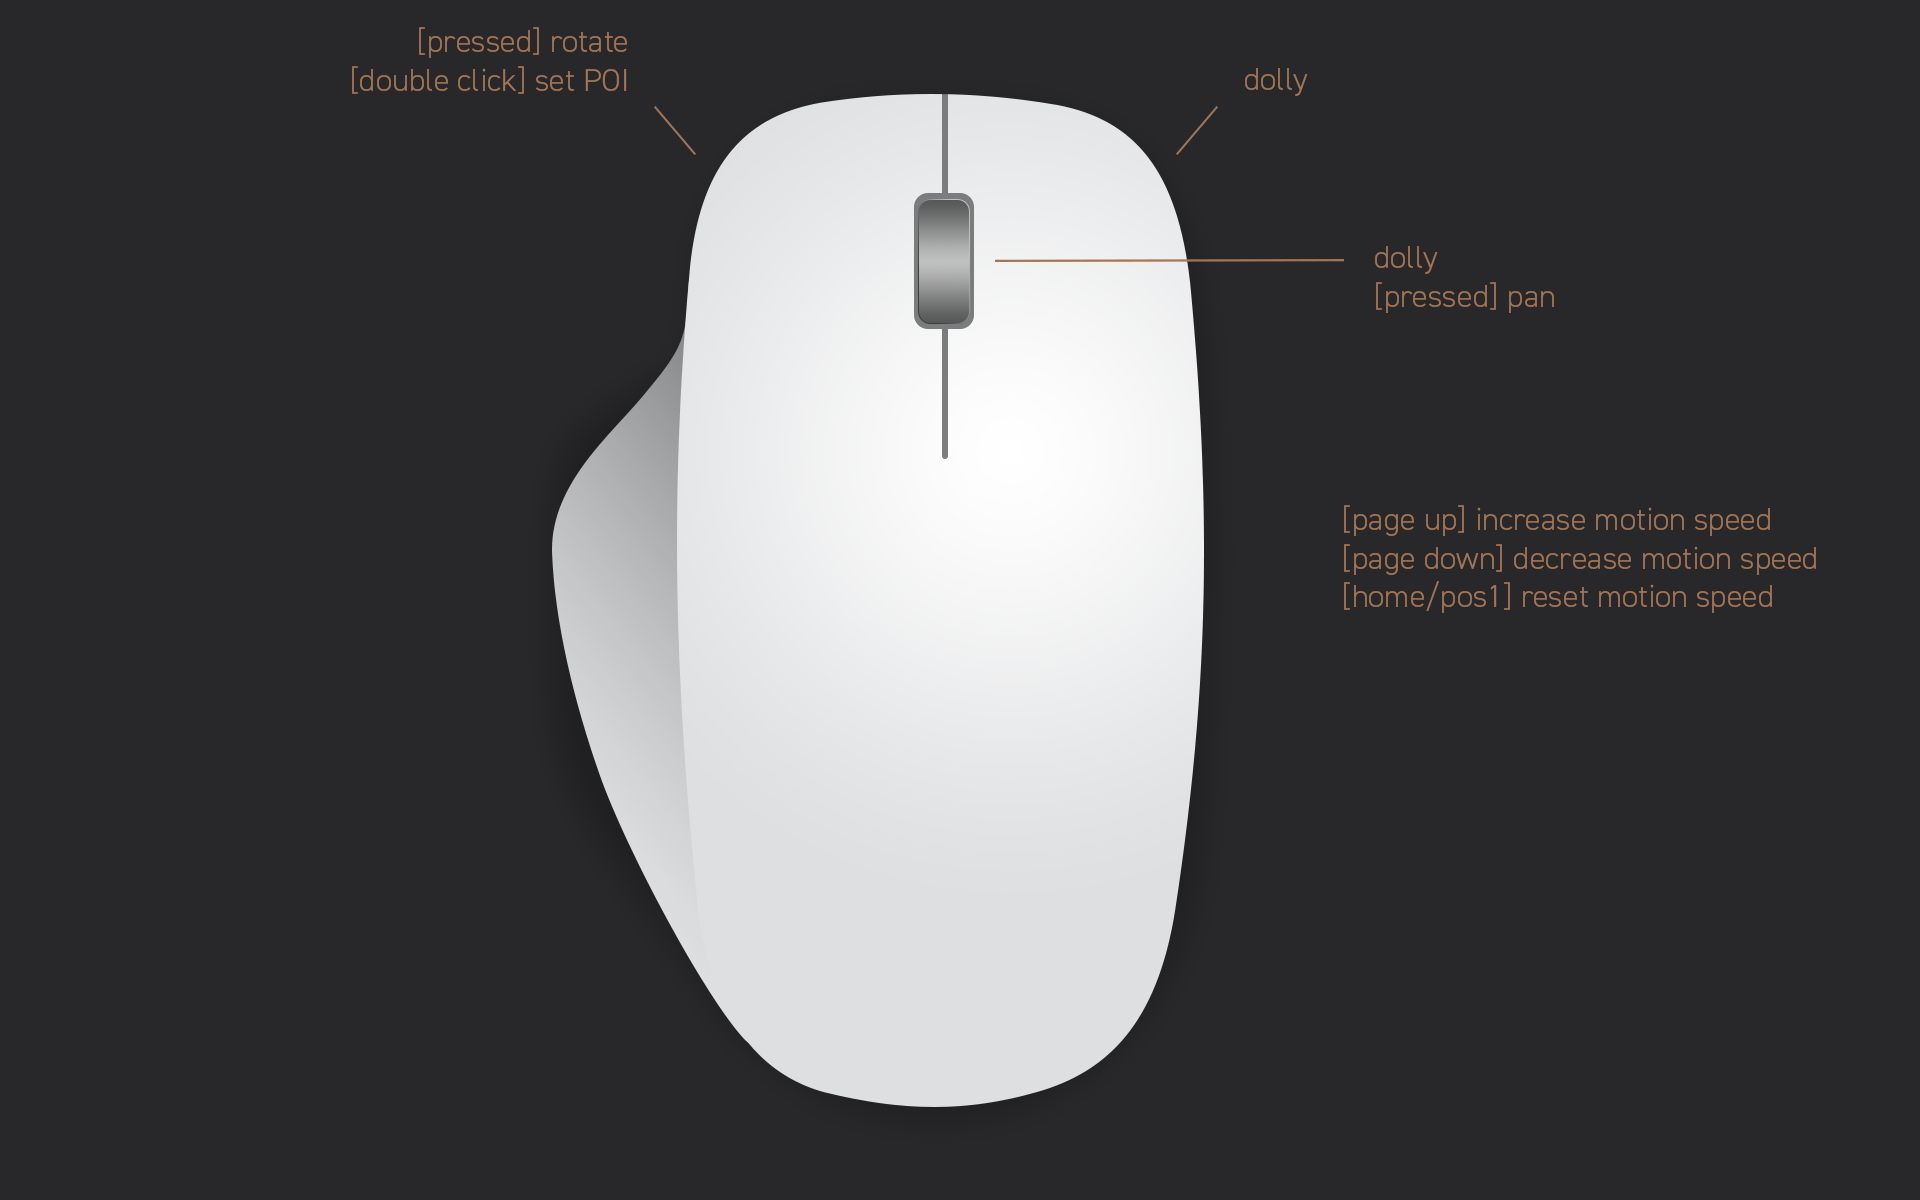
3.2 Gamepad control: